Fill forms and fields
With a form, data of a single entity can be displayed and modified in the GUI. When the user then saves his changes, the entity is adjusted in the background. With RapidClipse you can create a form as follows:
Drag an entity into the GUI builder. Now a dialog should appear with the individual properties of the entity.
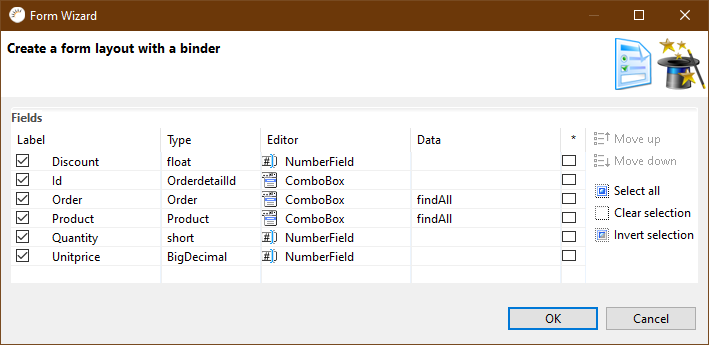
In this dialog you can select which properties of the entity should be displayed by checking or unchecking the check on the left.
In the field next to it, you can specify the name, which is displayed next to the input field.
In the Type column you can see the data types of the fields.
In the editor column you can select the Component you want to use for the field (e.g. for the Discount field you can also use a simple TextField instead of the NumberField).
In the Data column you can select the Query for the Sub-Entities, which will be used to get the Data for these Sub-Entities.
With the column with the * you can set the Required flag for this field.
When you select a row, you can then press move up and move down to change the position of the field.
After pressing OK the form will be generated for you.
In the outline you can see that a FormLayout with different FormItems has been created. Each FormItem contains the Label field with the name of the property, as well as the selected editor, with which the field can be changed. Below that there is also a Binder, which is not shown on the surface, but plays a big role for the DataBinding.

This binder connects the entity with the individual fields. To configure the binder, you can select it in the outline and then press Bindings in the properties view.
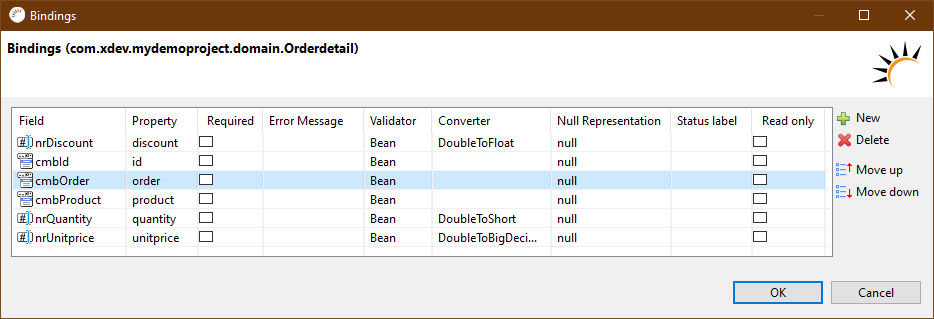
In the Required column, you can again customize which fields must be filled in by the user.
In the Error Message column you can enter which error message should appear if an incorrect value was entered.
In the Null Representation column you can specify which value should be used if the user has not filled in the field.
With the Read only column you can specify whether the field should be used for display only. The user cannot then change the value of the field.
Set the displayed entity:
When the form has been created, a value can be set using the binder. There are two different ways to do this:
setBean() and getBean()
With setBean(theEntity) an entity reference can be given to the binder. When a value in the form is changed, the corresponding field of the entity is changed at the same time. With getBean() the reference of the bound entity is returned. Example:
// Setting the bean
Entity myEntity = new Entity();
myEntity.setName("test");

binder.setBean(myEntity);

// Getting the bean
Entity boundEntity = binder.getBean();
readBean() and writeBean()
With readBean(theEntity) the values of the entity are read, but no reference to this entity is stored. That is, if a value in the form has been changed, the entity will not be updated. With writeBean (newBean) the values can be written from the form to an entity. Example:
// Reading the contents of myEntity into the Binder
Entity myEntity = new Entity();
myEntity.setName("test");

binder.readBean(myEntity);

// Writing the form values into a new Entity
Entity newEntity = new Entity();
try
{
    binder.writeBean(details);
}
catch(ValidationException e)
{
    e.printStackTrace();
}
A ValidationException is thrown when the validation for a field fails.