Create report
With the JasperReports integration, a template or template created with the JasperSoft Studio can be read, filled with data, and then displayed or saved. A report usually consists of three parts:
-
Fields
Fields are equivalent to the attributes of the entities in RapidClipse. They are like placeholders for the actual report data and are filled with the respective data at runtime. The data for the fields is always sent in the form of a list of
pass the report. This can be a "List / ArrayList" or a "Set / HashSet" typed on the respective entity. The following must be observed for the fields:-
The data type of the attribute and that of the target field must be identical
-
In the best case, both have the same name, because the assignment in the report is done via this name. But this is not necessary.
-
Fields can also contain binary data like blobs, clobs or byte[].
-
-
Parameter
Parameters can be static values passed to the report, such as the creator or the creation date. However, parameters can also be control data which, for example, define limit values which are then
decide whether other values are specially marked. Parameters are passed to the report as single variables, collected in a HashMap. The following must be observed for the parameters:-
The data type of the variable in Java and that of the target parameter must be identical
-
In the best case, both have the same name, because the assignment in the report is done via this name. But this is not necessary.
-
Parameters can also contain binary data like blobs, clobs or byte[].
-
-
Static Fields
Static Fields are static labels in a report which simply serve the description.
Options:
*Mapping Wizard
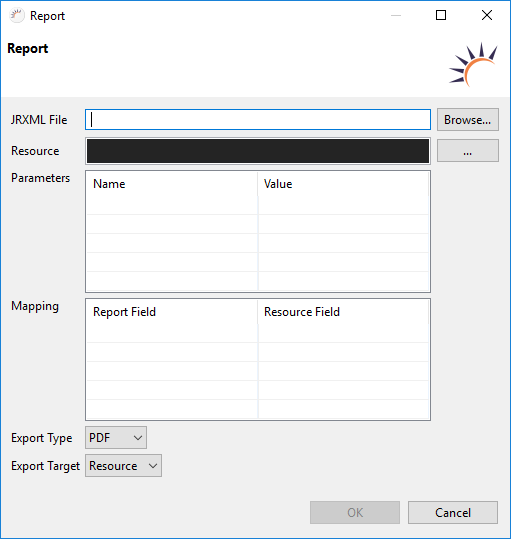
JRXML File - Select here the .jrxml file created by JasperSoft Studio. Do not specify the .jasper, i.e. the finished compiled file. This file should always be located in the project’s own Resources - reports folder. * Resource - For Resource, specify the data set or collection that contains the data for the fields. This can be done in several ways: Selection of a DAO method - click on the three dots to the left of the field, select a DAO class and a query method in this class. Load a result set yourself before calling the QueryWizard, e.g. via
+
List<Customer> allCustomers = new CustomerDAO().findAll();+ or
+
Order find = new OrderDAO().find(10248);
Set<Orderdetail> orderdetails = find.getOrderdetails();
+ or
+
List<BeanItem<Customer>> selectedItems = table.getSelectedItems();+ and then assign the variable name in this example "allCustomers", "orderdetails" or "selectedItems" to this field. * Parameters - The parameter mapping. Here the parameters available in the report are mapped to available variables. If you have specified the .jrxml, the parameters to be filled are read out and displayed automatically. * Mapping - The field mapping. Here the fields available in the report are mapped to the attributes contained in the resource. If you have filled the .jrxml and the resource properly, some contents should already be entered. Now you only need to check them and if necessary correct or complete them. Export Type - Select the type of document that will be generated at runtime. The following export types are available: PDF, HTML, XML, RTF, CSV, TEXT, XLSX, XLS, DOCX, PPTX, ODT. * Export Target - The following export targets are available: Resource Used if you want to display the created report immediately in the browser. byte[] * Used when you want to write the created report to the database or stream it to another place.
*How to bind a report
-
Create a report template using JasperSoftStudio. To do this, enter "Report Design" in the upper right corner of Quick Access and select the "Report Design Perspective". In this perspective you have the possibility to create a template similar to a form letter. A detailed description of how to create a template can be found in the documentation JasperSoft Studio Doc.
-
Copy the two files of the template (.jrxml and .jasper) into a newly created folder e.g. "Reports" within the Resources.
-
Select a suitable event for the execution of your report e.g. XdevButton and place your cursor there.
-
Click on the Report entry in the palette. The following dialog opens.
-
Fill in the individual fields and contents see Description to the Wizard above.
-
Close the dialog by clicking OK.
Using the result after the wizard.
-
After the wizard the following code is generated:
Report.New().jrxml("/report.jrxml") .dataSource(com.xdev.dal.DAOs.get(com.company.jasperreportsdemo.dal.ProductDAO.class) .getProductsOrderedByCategory()) .parameter("creator", "CK").parameter("created", new Date()).exportToResource(Format.Pdf()); -
Assign the generated statement to a variable +. a) Now position the cursor at the end of the entire statement i.e. after "exportToResource(Format.Pdf());"
b) Press Ctrl + 1 → Select "Assing statement to new local variable (Ctrl+2, L)" +. c) Confirm the selection with Enter.
A variable is now automatically created before the statement, which takes the resource.Resource exportToResource = Report.New().jrxml("/report.jrxml") .dataSource(com.xdev.dal.DAOs.get(com.company.jasperreportsdemo.dal.ProductDAO.class) .getProductsOrderedByCategory()) .parameter("creator", "CK").parameter("created", new Date()).exportToResource(Format.Pdf()); -
Create a component that allows you to view PDF sources:
@Tag("object") public class EmbeddedPdfDocument extends Component implements HasSize { public EmbeddedPdfDocument(final StreamResource pdfResource) { this(); this.getElement().setAttribute("data", pdfResource); } public EmbeddedPdfDocument(final String url) { this(); this.getElement().setAttribute("data", url); } protected EmbeddedPdfDocument() { this.getElement().setAttribute("type", "application/pdf"); this.setSizeFull(); } } -
Then add this component to your view:
Resource resource = Report.New().jrxml("/report.jrxml")
    .dataSource(com.xdev.dal.DAOs.get(com.company.jasperreportsdemo.dal.ProductDAO.class)
    .getProductsOrderedByCategory())
    .parameter("creator", "CK").parameter("created", new Date()).exportToResource(Format.Pdf());

final HtmlObject htmlPreview = new HtmlObject(resource, "application/pdf");
htmlPreview.setSizeFull();

final Dialog dialog = new Dialog(htmlPreview);
    dialog.setWidth("900px");
    dialog.setHeight("700px");
    dialog.open();